

Introduction
It is the process of writing. You will be required to engage in a variety of writing assignments throughout the course of your academic program. These assignments will range from lengthy essays and reports that could take up to two months to complete to shorter essays that are written under exam conditions. Many students make the mistake of beginning their writing before they are ready to do so, and then assuming that they have completed their work once they have completed their first draft. In point of fact, the production of a piece of writing that is of high quality involves a number of steps, the first of which is the identification of the title, and the last of which is the submission of the work. This series of steps is referred to as “The Writing Process.” The precise procedure will change completely depending on the type of writing that you are currently working on. A brief summary of the two primary types is provided below.
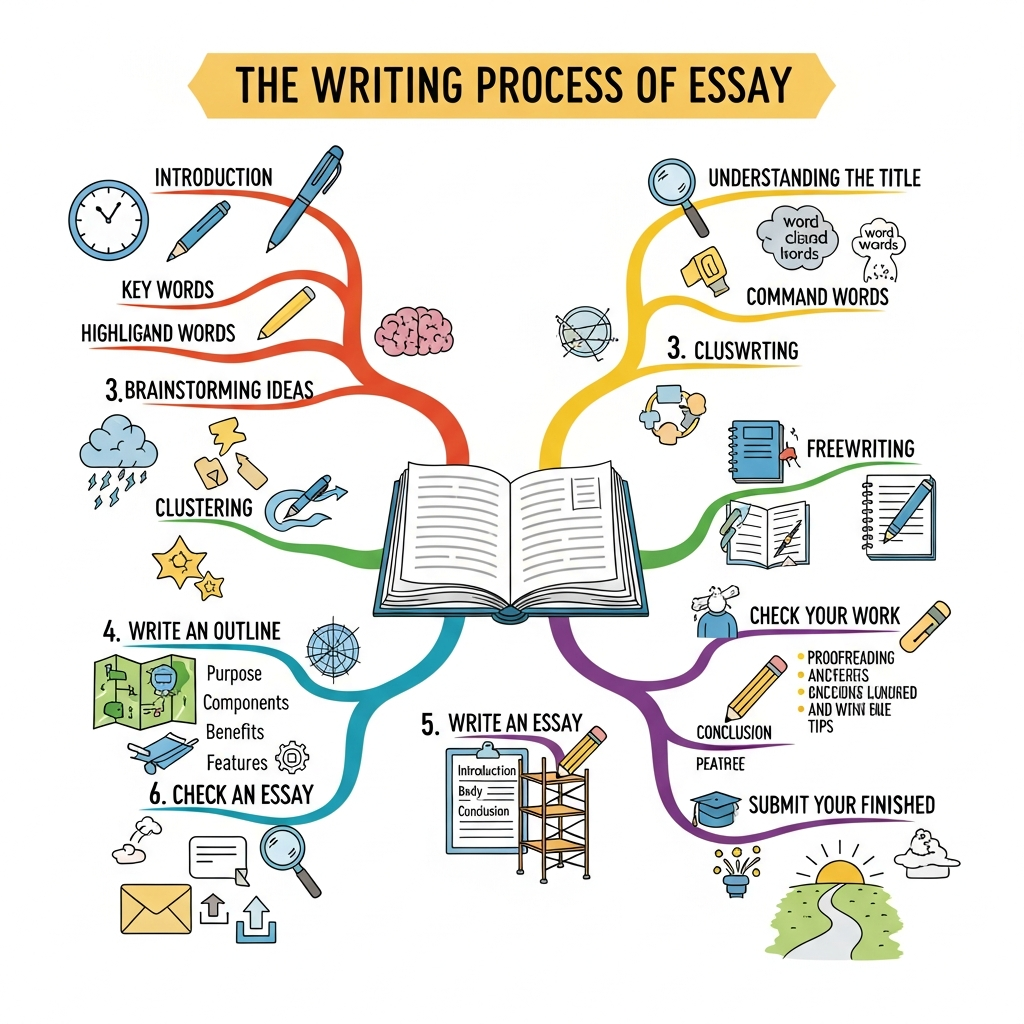
Understanding the Title
The very first step in the writing process—often overlooked but absolutely crucial—is to fully understand the title or the question you’ve been given. This isn’t just a formality; getting this part wrong can derail your entire essay, potentially making all your hard work pointless. Imagine spending hours researching and writing, only to realize you haven’t actually answered the question being asked. Unfortunately, this is a common issue, and many tutors express frustration when students don’t directly address the assigned question.
Taking the time at the beginning to really analyze and interpret the title will set a strong foundation for your work. When you clearly grasp what’s being asked, you’ll not only be able to craft a more focused and relevant essay—which increases your chances of earning a higher grade—but you’ll also save time and effort during your research. Your background reading and note-taking will be much more targeted because you’ll know exactly what information you need to gather.
To truly understand the question, pay close attention to two important elements: the key words and the command words found in the title. Key words help you identify the main topics or themes you need to address, while command words tell you what you’re supposed to do with those topics (for example, analyze, compare, discuss, etc.). Both of these aspects are essential for making sure your writing stays on track and meets the requirements of the assignment. We’ll take a closer look at each of these next.
Key Words
When you first read the essay title or question, it’s important to start by identifying and underlining the key words. These are the main terms or concepts that your essay needs to focus on. Sometimes, these words will be central to your entire response, and you may even need to define them clearly within your answer to show that you understand exactly what they mean in the context of your subject.
Alongside the key words, you should also pay close attention to the command words (which we’ll talk about in more detail next). Command words are crucial because they tell you what kind of approach you should take when answering the question—whether you’re supposed to “analyze,” “compare,” “discuss,” or something else entirely.
Don’t rush through this step. It’s a good idea to read the question multiple times, each time looking for subtle differences or hidden requirements. This helps ensure you fully grasp what’s being asked and don’t accidentally miss an important aspect of the assignment. If you’re working on a researched essay rather than an exam response, consider taking your interpretation of the question to your tutor. Discussing it with them can help clarify any uncertainties and make sure you’re on the right track from the very beginning.
By taking these extra steps to understand the key words and overall question, you’ll set yourself up for a more focused, effective, and relevant essay.
Command Words
Command words—sometimes called directive words or instruction words—are an essential clue in any essay title or assignment prompt. These are usually verbs, and they tell you exactly what you’re being asked to do in your answer. Understanding these words is crucial because they shape the structure and focus of your response. Misinterpreting a command word can lead you to approach the question incorrectly, even if your content is otherwise strong.
Here are some of the most common command words you’re likely to encounter, along with explanations in everyday language:
- Account for: Explain the reasons behind something. For example, if you’re asked to “account for the rise in online shopping,” you need to look at why this trend is happening. (Don’t confuse this with “give an account of,” which asks for a description of what happened rather than why.)
- Analyse: Break a topic or idea down into parts, examine each part closely, and consider how they’re connected. This type of answer should be well-organized and logical.
- Assess: Judge the importance or value of something by weighing up the evidence. You’ll need to come to a conclusion about how much you agree or disagree with the original statement.
- Clarify: Make something clearer by explaining it in simpler terms—perfect for complex theories or processes.
- Comment upon: Pick out the main points and give your opinion about them.
- Compare: Identify both similarities and differences between two or more things. Even though “compare” technically means to look at similarities, in academic writing you should also highlight differences.
- Consider: Reflect on the subject, using evidence from your own experiences or from other sources to support your points.
- Contrast: Focus solely on the differences between two or more things.
- Criticise: Point out weaknesses or disadvantages, but also acknowledge strengths. A balanced answer is important here.
- Define: Provide a clear and precise meaning for a term. You might also discuss any difficulties with the definition and mention alternative definitions if they exist.
- Demonstrate: Show how something works or happens, usually by giving concrete examples.
- Describe: Outline the characteristics or features of something, or explain how or why it works.
- Discuss: Present arguments both for and against a topic, using evidence to support each side. Bring your answer to a conclusion by weighing up the points.
- Disprove: Argue against a statement, showing why it isn’t true, with logical reasoning and evidence.
- Elaborate: Expand by adding more detail or information about the subject.
- Elucidate: Make something easy to understand, often by giving a clear explanation.
- Evaluate: Similar to “assess”—weigh up the merits of something and reach a judgment. If you see “critically evaluate,” it means you should assess both the strengths and weaknesses.
- Examine: Look at all aspects of a subject in detail. Explain why certain facts or issues are particularly important.
- Explain: Provide a detailed account of how or why something happens, or what something means. Definitions of key terms are often needed.
- Explore: Investigate a topic from different perspectives, considering various viewpoints and possibly reconciling them at the end.
- Give an account of: Provide a detailed description of something—focus on what happened, rather than why.
- Identify: Point out the key points and explain their significance.
- Illustrate: Use specific examples or data to make your point clearer.
- Interpret: Explain what something means, showing your understanding—this could be about a writer’s terminology or research findings, for example. You might discuss trends or causes.
- Justify: Give clear reasons for your position, and try to include counter-arguments to show you’ve considered other viewpoints.
- Outline: Give a brief summary of the main points, without going into detail.
- Prove: Argue in favor of a statement, showing why it’s true with logical evidence.
- Review: Examine a topic thoroughly, offering a critical rather than just descriptive perspective.
- Show how: Explain the steps or factors that lead to something, in a logical sequence.
- State: Present the relevant facts or points clearly and concisely, without lengthy discussion.
- Summarise: Give a short overview of the main points—avoid too much detail.
- To what extent: Similar to “discuss,” but focus on how true you think the statement is. You’ll present both sides with evidence, but you might lean more toward one side depending on your view.
- Trace: Describe the development or sequence of something in chronological or logical order. This is often used in historical topics.
Brainstorming Ideas
Once you’ve taken the time to really understand your essay title or assignment question, the next important step is to start generating ideas. This stage is all about getting your creative juices flowing, and one of the most effective ways to do this is through a technique known as “brainstorming.”
So, what exactly is brainstorming? At its core, brainstorming is about coming up with as many ideas as possible in a short amount of time. The goal is quantity, not quality—at least at first. Don’t worry about whether your ideas are good or bad, sensible or silly. The important thing is to let your mind roam freely and jot down everything that comes to mind. The words “many” and “quickly” really are key here. A lot of students make the mistake of stopping after they’ve written down just a handful of ideas, but that’s not true brainstorming. Think of it like a storm: it should be energetic, powerful, and result in a downpour of ideas.
You might be wondering why it’s worth spending time on this step. The truth is, although brainstorming might take a little effort upfront, it will actually save you time and frustration later on. There’s nothing more discouraging than starting an essay with confidence, only to find yourself stuck halfway through and unable to think of what to say next—commonly known as “writer’s block.”
Effective brainstorming helps you avoid that scenario by giving you a pool of ideas to draw from when you start outlining and drafting your essay. Plus, it often leads you to unexpected angles or insights you might not have considered otherwise.
There are several popular techniques for brainstorming, and everyone has their own preferences. Three particularly useful methods you might want to try are clustering, listing, and freewriting. Each of these approaches has its own advantages, and you might find that one works better for you than the others—or that a combination is most effective. In the following sections, we’ll take a closer look at how each technique works and how you can use them to kick-start your writing process.
Clustering
Clustering, which is also known as mind-mapping, is a brainstorming technique that relies on visual organization. If you’re someone who prefers to see your thoughts laid out in front of you, clustering can be especially helpful. The beauty of this method is that it allows you to gather and structure your ideas on the page in a way that mirrors how your mind makes connections. This not only sparks creativity but also makes it much simpler to move on to creating a structured outline for your essay or assignment.
Many students find clustering to be the most user-friendly brainstorming tool, and it’s easy to see why. By visually mapping out your ideas, you can quickly spot patterns, group related concepts, and see how different points might fit together in your final piece. This approach can be particularly useful when you’re feeling overwhelmed by information or when the topic is broad and complex.
Here’s how clustering typically works: Start by writing your main topic or essay question in the center of a blank page and circle it. Then, as ideas come to you, jot them around the central idea, drawing lines to connect related thoughts. These secondary ideas can branch off further, creating a network or “map” of your thinking. There’s no need to worry about order or logic at this stage—it’s all about letting your mind wander and seeing where it takes you.
For example, let’s say you’re preparing for a short essay in an exam, with the topic: “Discuss the advantages and disadvantages of the internet.” In a clustering session, you’d put “Internet: Advantages and Disadvantages” in the center, and then allow your thoughts to radiate outwards. One branch might cover “Communication,” with sub-branches for “Instant messaging,” “Global connections,” and “Social media.” Another might be “Information,” leading to “Easy access to knowledge” and “Misinformation.” You can keep adding branches for things like “Online shopping,” “Entertainment,” or “Privacy concerns,” grouping pros and cons as you go.
By the end of your clustering session, you’ll have a visual map of your thoughts, making it much easier to organize them into a clear structure for your essay. This method is not only practical, but it can also make the brainstorming process more enjoyable and less stressful.
Listing
Listing is a straightforward and efficient brainstorming technique—just as the name implies, it involves simply writing down all the ideas that come to mind in a list format. There’s no need to worry about the order or organization at this stage; the main goal is to get your thoughts out of your head and onto the page as quickly as possible.
One of the biggest advantages of listing is its speed. Because you don’t have to stop and organize your ideas visually, as you would with clustering, you can often generate a larger number of ideas in a shorter amount of time. This technique is especially useful if you’re pressed for time or if you tend to think in a more linear way.
To use listing, start by jotting down your essay question or topic at the top of the page. Then, as ideas pop into your mind, write each one down as a separate bullet point or line. Don’t worry about whether each idea is a pro or a con, or how they’ll fit together later—just keep writing until you’ve exhausted your thoughts.
For example, say you’re working with the essay topic: “Discuss the advantages and disadvantages of the internet.” You might quickly list out points such as:
- Easy access to information
- Faster communication
- Global connectivity
- Online shopping
- Privacy concerns
- Spread of misinformation
- Cyberbullying
- Entertainment options
- Distance learning opportunities
The key is to keep your pen moving and not judge your ideas as you go. Once you have a good list, you can go back and sort your points into categories, organize them into a logical order, or use them to build your essay outline.
Freewriting
Freewriting is a unique and liberating brainstorming technique that encourages you to write non-stop about a topic for a set period of time. Unlike listing or clustering, which are more structured, freewriting is all about letting your thoughts flow freely onto the page, without worrying about grammar, spelling, or organization. The idea is simple: start with your topic, and then write whatever comes to mind, allowing one thought to lead naturally to the next.
The main benefit of freewriting is that it can help you break through creative blocks or generate ideas when other brainstorming methods just aren’t working. Sometimes, when you let your mind wander and write without restrictions, unexpected ideas and connections will emerge. However, it’s worth noting that freewriting can be a bit time-consuming, and the resulting notes will often be quite messy and disorganized. For this reason, it’s not the most popular option among students working on academic essays. Most of what you produce during a freewriting session probably won’t make it into your final draft, but it can be a great way to get your thoughts moving, especially if you’re feeling stuck.
Freewriting tends to be more useful for creative projects, like stories or personal reflections, but it can still be a helpful tool in academic writing if you’re struggling to get started or need to unlock new angles on a topic.
If you’d like to try freewriting, here’s a simple approach:
- Write your topic at the top of the page. This helps keep your focus as you write.
- Begin writing about the topic, and don’t stop for a set period of time (for example, 5 or 10 minutes). Let your thoughts flow, and don’t worry if your writing is repetitive, goes off-topic, or isn’t very organized. Just keep going!
- Try to include any supporting facts, examples, or details that come to mind, but don’t stress if you don’t have many at this stage. The goal is to generate as much raw material as possible.
- When you run out of ideas or your time is up, read back through what you’ve written. Highlight or circle any ideas, phrases, or sentences that seem useful or interesting.
- Group similar ideas together to see if any patterns or themes emerge. Use these to start creating an outline for your essay or assignment.
- If you find you need more ideas, consider switching to another brainstorming technique, like listing or clustering, to build on what you’ve started.
Freewriting might feel a bit chaotic, but it’s often in that chaos that your best and most original ideas can emerge. Give it a try if you’re looking for a fresh approach, or if you just need to get your thoughts flowing before you move on to a more organized stage of the writing process.
Write an Outline
Once you’ve finished brainstorming and, if necessary, completed any background research for a longer or more in-depth paper, the next important step is to create an outline. This part of the writing process is all about bringing order to your ideas before you start working on your first draft.
An outline acts as a roadmap for your essay or report. Think of it as a blueprint that helps you organize your main points, decide on the best structure, and ensure your writing will flow logically from one idea to the next. While it might seem tempting to jump straight into drafting your work, taking the time to outline first can save you a lot of time and stress later on. It gives you a clear sense of direction and helps prevent you from getting lost or going off-topic as you write.
So, what exactly is an outline? In simple terms, it’s a plan that lays out the key ideas you want to include in your writing and shows how those ideas fit together. For an essay, your outline will often include the main components of your introduction—such as a thesis statement that clearly states your argument or main point. It will also map out each body paragraph, typically with topic sentences and a brief note on the evidence or examples you’ll use in support. Finally, your outline will include elements of your conclusion, like how you plan to summarize your main points and reinforce your thesis.
Outlines aren’t just for essays, either. They’re just as valuable when you’re preparing a report, a presentation, or any other structured piece of writing. No matter what you’re working on, a good outline helps you see the big picture before you get caught up in the details.
The sections that follow will show you what an effective outline looks like, discuss why outlining is such a helpful step, and highlight the key features of a strong outline. There’s also a handy checklist at the end so you can review your own outline and make sure you’re on the right track.
Taking the time to create a thoughtful outline may feel like an extra step, but it’s one of the most valuable habits you can develop as a writer. It will make the drafting process much smoother and help you produce clear, well-organized, and compelling work.
Why Outline?
Taking the time to write an outline before you dive into your first draft brings several important benefits to your writing process.
First, an outline helps you organize your ideas in a clear and logical way. This is especially important when you’re working on longer, more complex assignments—like a researched essay—where you might have a lot of information and sources to keep track of. But even for shorter essays, a well-structured outline makes sure your points are presented in an order that’s easy for your reader to follow, strengthening the flow of your overall argument.
Second, outlining helps ensure your writing has unity. In other words, it encourages you to stick to your main point and only include ideas that directly support your central theme or thesis. When you create an outline, you’re forced to think about what’s truly relevant to your topic and what might be a distraction. This keeps your paragraphs focused and prevents you from wandering off-topic, which is something that can easily happen if you start writing without a plan.
Finally, outlining makes the writing process feel much more manageable. The thought of tackling a long assignment—like a 1,500-word essay—can feel overwhelming. But if you break it down and start with a simple outline, maybe just 100 words mapping out your main ideas and structure, the task suddenly becomes a lot less intimidating. You can then approach your essay one section at a time, following the clear roadmap you’ve set for yourself.
In short, outlining isn’t just an extra step; it’s a valuable tool that can save you time, reduce stress, and help you produce writing that is organized, clear, and focused. It lays the groundwork for a stronger, more coherent piece—whether you’re working on a short essay or a detailed research paper.
What Does an Outline Look Like?
Outlines can come in many different shapes and styles, and the best format for you often depends on your assignment and personal preferences. When you’re pressed for time—such as during an exam—a very simple outline might be all you need. In this quick approach, you can just take the ideas you came up with during brainstorming and put them in order by numbering or lettering them. This helps you see the sequence of your argument before you start writing, even if you only have a few minutes to plan.
However, if you have more time or are working on a longer assignment, most outlines are written in a more linear fashion, similar to the way you might take notes when reading a book or listening to a lecture. In this style, you lay out your ideas in a clear, step-by-step format, breaking down your main points and supporting details. This not only helps you organize your thoughts but also makes it much easier to turn your outline into a strong, well-structured first draft.
Let’s look at an example. Here’s a more detailed outline for the section “Why outline?” we discussed earlier:
An outline will assist you in your writing for three main reasons:
Organize ideas
Keeps track of ideas (especially important for longer writing)
Puts ideas in logical order
Create unity
Ensures all ideas relate to the central theme
Includes only relevant ideas
Excludes irrelevant ideas
Aid the writing process
Breaks down the task into manageable steps
Makes a 1,500-word essay easier to tackle with a 100-word “map”
As you can see, this outline is fairly detailed. It includes the main point of the paragraph, the three supporting ideas, and even breaks those down into smaller points. This level of detail can be really helpful because it gives you a clear structure to follow when you start writing.
Now compare that to a much simpler version of the same outline, which might look like this:
An outline will assist you in your writing:
- Organize ideas
- Create unity
- Aid the writing process
This version lists only the key points. It’s quicker to write but doesn’t provide as much guidance when you sit down to draft your paragraph.
There’s no single “right” way to outline. Some people prefer a detailed outline because it makes the actual writing process smoother and faster, while others like a simpler outline that gives more flexibility as they go. You might find it helpful to experiment with both approaches and see which one works best for you. The important thing is to use your outline as a tool to clarify your thinking and provide direction as you turn your ideas into a finished piece of writing.
What Are the Features of a Good Outline?
To really make your outline work for you, it should include a few key features that help keep your ideas clear, organized, and easy to follow. These features ensure your outline is not only a useful planning tool, but also that it will help guide your writing in a logical and effective way.
1. Parallel Structure
A good outline uses parallel structure, which means that each heading and subheading follows the same grammatical form. This consistency makes your outline easier to read and helps your writing stay focused. For example, if your main points are all action words like “Organize,” “Create,” and “Aid,” then your supporting points should also be in the same form, like “keep track,” “put in,” or “include.” Keeping everything in a similar format helps you see the relationships between your ideas and makes the transition from outline to draft much smoother.
2. Coordination
Coordination means that each heading or subheading is equally important within its level of the outline. In other words, your main points (for example, points 1, 2, and 3) should all be on the same level and of equal significance—they’re your core reasons or arguments. Likewise, your supporting points (labeled i., ii., etc.) should each play an equally supportive role under their main heading. This prevents you from giving too much weight to one idea over the others, and keeps your writing balanced.
3. Subordination
Subordination is the idea that your main headings should be broad, general ideas, while your subheadings become more specific. Think of it like a tree: the trunk is your main idea, and the branches are the details that support or explain it further. In the sample outline, the main points (“Organize ideas,” “Create unity,” “Aid in writing process”) are general, while the subpoints provide specific examples or details that help explain or support the main point.
4. Division
If you’re creating a detailed outline, another helpful feature is division. This means that each heading should be broken down into at least two parts or supporting details. If you find a heading that only has one subpoint underneath it, see if you can divide it further or combine it with another section. Division helps make your outline more thorough and ensures that you’re fully developing each of your main ideas.
By building your outline with these features in mind, you’ll set yourself up for a much smoother and more successful writing process. Your ideas will be easier to organize, your paragraphs will be more focused, and your argument will come across as clear and well-structured to your reader. Remember, the outline is your writing roadmap—taking the time to make it solid will pay off when you start drafting your work.
Write an Essay
Once you’ve spent time brainstorming and created a solid outline, you’re ready for the next big step: actually writing your essay. This is where all your planning and preparation come together on the page.
Writing an essay can sometimes feel like a daunting task, but having a clear outline makes the process much more manageable. Now, instead of staring at a blank page, you have a roadmap to guide you—each section of your outline provides a starting point for a paragraph or a key idea. Think of your outline as scaffolding: it supports your ideas as you build your argument, step by step.
Start by crafting your introduction. This is your chance to grab the reader’s attention, present your topic, and state your thesis or main argument. A strong introduction sets the tone for the whole essay and lets your reader know what to expect.
Next, move on to the body paragraphs. Each paragraph should focus on one main idea from your outline. Begin with a clear topic sentence, then use supporting details, evidence, and examples to develop your point. Remember to connect your ideas with smooth transitions so that your essay flows naturally from one paragraph to the next.
Finally, wrap up with a thoughtful conclusion. Summarize your main points, restate your thesis in a new way, and leave the reader with something to think about. Your conclusion should bring closure to your essay, tying everything together and reinforcing the argument you’ve made.
As you write, don’t worry too much about making everything perfect on the first try. The first draft is your opportunity to get your ideas down on paper. You’ll have a chance to revise and polish your work later. Focus on expressing your thoughts clearly and fully, following the structure you planned in your outline.
Remember, writing is a process, and it’s normal to make changes along the way. If you get stuck, refer back to your outline, brainstorm new ideas, or take a short break to clear your mind. With patience and persistence, you’ll find that the ideas start to flow, and your essay will take shape.
In the end, the most important thing is to communicate your ideas clearly and effectively. With solid preparation, a detailed outline, and a willingness to revise, you’ll be well on your way to writing a successful essay.
Check Your Work
After you’ve finished writing your essay, there’s one final, crucial step before you can consider your work complete: checking your work through proofreading. Proofreading is the last stage of the writing process, and it’s your chance to catch any mistakes and polish your writing so it’s as clear, accurate, and professional as possible.
So, what exactly is proofreading? It’s the careful process of reading through your essay (or any piece of writing) to spot and correct errors in spelling, grammar, punctuation, and formatting. It also gives you an opportunity to check for awkward sentences, unclear ideas, or anything that just doesn’t sound quite right. Even the best writers make small errors or overlook things on the first draft, so taking the time to proofread is always worth the effort.
Proofreading your own work can be surprisingly tricky, especially after you’ve spent a lot of time writing and revising. Your brain tends to see what you meant to write, rather than what’s actually on the page. To help you proofread effectively, here are some useful tips:
- Take a break before proofreading. If possible, set your writing aside for a little while so you can come back to it with fresh eyes.
- Read your essay out loud. Hearing the words can help you catch mistakes or awkward phrasing that you might miss when reading silently.
- Check one type of error at a time. For example, do a pass just for spelling, then another for punctuation, and so on.
- Pay close attention to common problem areas. Watch out for run-on sentences, subject-verb agreement, or misused words.
- Use tools—but don’t rely on them completely. Spellcheckers and grammar checkers can help, but they don’t catch everything, so always review your work yourself.
- Ask someone else to read your essay. A fresh pair of eyes can often spot things you’ve missed.
- To make the process even easier, there’s a proofreading checklist at the end of this page. Use it to guide your review and ensure you’ve covered all the important areas.
Remember, proofreading is your last opportunity to make sure your work represents your best effort. Taking this step seriously can make the difference between a good essay and a truly excellent one.
What is Proofreading?
Proofreading is the careful act of reading through your writing with the specific goal of catching and correcting any mistakes before you consider your work finished. The term “proof” actually comes from the publishing world, where a proof is a preliminary version of a manuscript that is checked for errors before it goes to print.
By the time you reach the proofreading stage, you’re nearly at the finish line. You’ve already put in a lot of effort—brainstorming, outlining, researching, and shaping your ideas into a structured draft. At this point, your main arguments and the overall flow of your piece should already be in place. Now, your focus shifts away from big-picture concerns like content and organization, and zeroes in on the finer details: grammar, punctuation, spelling, and formatting.
Proofreading might feel tedious, especially if you’re up against a tight deadline, but it’s an essential step that can make a world of difference in your final work. Small errors can distract your reader, weaken your credibility, and even affect your grades. On the other hand, polished, error-free writing demonstrates your attention to detail and your commitment to quality.
Proofreading Tips
Proofreading is a crucial final step, but it’s easy to overlook important details if you rush through it. Here are some practical tips to help you proofread your work effectively and catch as many errors as possible:
1) Take a Break Before You Proofread
Don’t jump straight into proofreading as soon as you finish writing. When your writing is fresh in your mind, you’re more likely to overlook mistakes because your brain fills in what you intended to say. If you can, step away from your work for a while—even just a few minutes can help. Ideally, if time allows, set your writing aside for a day or two before starting the proofreading process. This distance lets you come back to your work with fresh eyes and a new perspective, making it much easier to spot errors.
2) Use a Spellchecker, But Don’t Rely on It Alone
Make use of the spellchecker built into your word processor, such as Microsoft Word’s spellcheck function. Even if you’ve already run a spellcheck on earlier drafts, do it again after making any final changes, as new errors can creep in. Keep in mind, though, that spellcheckers aren’t perfect—they might miss certain types of mistakes, so don’t use them as your only line of defense.
3) Watch Out for Your Common Mistakes
Everyone has their own “usual suspects” when it comes to writing errors. Maybe you often mix up their and there, or you tend to forget apostrophes, or perhaps you struggle with subject-verb agreement. Use feedback from previous assignments to identify these patterns, and pay extra attention to them when proofreading. Creating a personal checklist of your common mistakes can be a helpful reminder.
4) Slow Down and Read Carefully
Proofreading requires a slower, more deliberate reading pace than your usual reading. Take your time and examine each word and sentence closely. If you skim through too quickly, you’ll almost certainly miss errors. Some people find it helpful to read their work aloud—this can help you catch awkward phrasing and mistakes you might not notice when reading silently.
5) Check for Tricky Spelling Issues
Be especially careful with homophones, which are words that sound the same but have different meanings and spellings (like there, their, and they’re). These mistakes are easy to make, even for proficient writers, and spellcheckers often won’t flag them. Also be on the lookout for real words used incorrectly—for example, writing “form” when you meant “from,” or “accept” instead of “except.” These types of errors can easily slip through unnoticed.
6) Review a Printed Copy If You Can
Sometimes, changing the format of your writing can help you spot mistakes you missed on the screen. If possible, print out your essay and read it on paper. The change in medium can make errors stand out in a way they might not when you’re staring at your computer.
Submit Your Finished Work
After all the hard work you’ve put into brainstorming ideas, organizing your thoughts, writing drafts, and carefully proofreading, it’s finally time for the last step: submitting your finished work. This stage might seem straightforward, but it’s still important to approach it thoughtfully to make sure everything goes smoothly.
Before you hit “submit” or hand over your assignment, take a moment to double-check that you’ve met all the requirements. Make sure your work is formatted according to your instructor’s or institution’s guidelines—this might include things like font size, margins, spacing, and citation style. If your assignment needs to be uploaded to an online portal, ensure you’ve saved it in the correct file format and that the document opens properly.
It’s also a good idea to review any instructions one last time. Confirm that you’ve included all necessary components, such as a title page, bibliography, or any appendices, if these are required. Attach any supporting documents, cover sheets, or forms that might be needed.
If your instructor asks for a physical copy, check that your pages are in order, securely fastened, and that your name and other required information are clearly displayed. If you’re submitting electronically, wait for a confirmation of receipt, if possible, to make sure your work was successfully received.
Finally, take a moment to reflect on the effort you’ve put in and allow yourself to feel a sense of accomplishment. Submitting your work is the last step in the writing process, and it’s something to be proud of.
With your polished, thoughtfully prepared assignment submitted, you can move forward knowing you’ve done your best. Now, take a deep breath and give yourself a well-earned break—you’ve completed the journey from your first idea to your finished piece!
Conclusion
In conclusion, mastering the writing process is an invaluable skill for any student or academic writer. By taking the time to understand your assignment, brainstorm ideas, create a clear outline, draft thoughtfully, and carefully proofread before submitting, you ensure that your work is both effective and polished. Remember, good writing is a journey that involves planning, creativity, and attention to detail at every stage. With these strategies in hand, you’ll be well equipped to tackle any writing assignment with confidence and clarity.